We need a cradle for the cab which will allow maximum access from all angles, as well as the ability to move the cab easily around the workshop. Because much of the restoration work may be farmed-out, I also want the cab to be transportable on my 2.4m x 1.2m trailer. All the LAD cabs use the same mounting points (I hope!), so this frame will get a bit of use.
I acquired a set of mobile scaffold wheels that are braked, height adjustable and far exceed the required weight rating. I'm estimating the cab weight at around 400kg including the doors, the glass, and associated fittings.
 Here the cab sits on the crate base after unpacking. You can see that the crate incorporated a steel packing bracket bolted to the rear cab/chassis mounting points.
The two rear points are about a metre apart and the front one is at the base of a substantial support bracket in the radiator aperture.
This was screwed to wooden blocks in the crate and there were expanding foam packing bags on the lower front corners.

I've bolted a couple of long 6x2's (sorry, that's 150mm x 50mm) to the rear packing bracket and passed them under the front so I can use the hoist to lift the cab while fabricating a cradle.

I'm using 80mm x 40mm RHS with a thick (4mm) wall for the frame. Its always a dilemma between keeping the whole thing at a manageable weight and having to add extra bracing because of using light materials. This box section is well up to the task, and I'm hopeful I'll be able to lift it in its finished state.

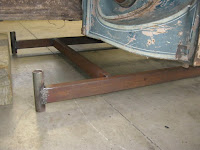
 < The scaffold wheels will slide into pipes at each corner so they can be easily removed when the frame is on a trailer. I've ground the ends of the main base stringers concave for a close fit. All joints are fully welded for strength. >
The cradle is basically a rectangular frame with three mounting points - one wide one at the front and two higher ones at the rear. Starting here with the main frame and wheel mountings.
Centre of gravity is toward the front of the cab, so I extended the frame about 300mm out from the front for stability and to allow adequate clearance for access.
Front support uprights are splayed to spread the load and add some lateral support. Much of the cab weight is forward, so this needs to be a pretty robust structure. Minimum support height is dictated by the requirement for about 300mm deck clearance at the front corners of the cab (the lowest point). This is necessary to clear the sides of my trailer because the cab overhangs it by about 400mm each side.
 It turned out to be a little tricky finding a way to support the cab when I needed to remove the packing bracket because of the unequal heights. The rear lower corners of the cab were strong enough for the hoist pads and I used a chain around the front support bracket onto one hoist arm.
 < Pipe spigots are welded to the tops of the rear support pads to locate the rear cab mounting points...... And the pads welded to the uprights. I left the part adjacent to the drilled hole unwelded to allow room for a nut when the cab is bolted to the frame. >
 < Here the rear uprights are attached to the frame and a 40x40mm brace is added between them.
 And diagonal angle-steel braces between the uprights and the lower frame >
Now a few photo's of the finished frame with a coat of paint on it.


 And with the wheels fitted. They are on long threaded spigots, so can be height-adjusted.
Now I wheel the cradle under the cab and lower the cab onto it. All three mounting points lined up fine. I put bolts through the rear ones, but still need to drill the holes for the front mount.
I left the hoist arms in place and swung on the outside of the cab to check stability. I am about 90kg and swinging right out on the front corner of the cab did not lift opposite side rear wheel. Next I'll try a tilt test to see how far the cab can be tilted while bolted to the cradle before it reaches tipping point.


No comments:
Post a Comment